Karpenter GCP provider is now available in preview, enabling intelligent autoscaling for Kubernetes workloads on Google Cloud Platform (GCP). Developed by the CloudPilot AI team in collaboration with the community, this release extends Karpenter's multi-cloud capabilities.
⚠️ This is a preview release and not yet recommended for production use, but it's fully functional for testing and experimentation.
In this tutorial, you'll learn how to deploy the GCP provider using the Helm chart, configure your environment, and set up Karpenter to dynamically launch GCP instances based on your workloads.
Prerequisites
Before you begin, ensure the following are set up:
- A running GKE cluster with Karpenter controller already installed (see Karpenter installation guide).
- kubectl configured to access your GKE cluster.
- helm (v3+) installed.
- Karpenter CRDs already installed in your cluste
- GCP permissions: The Karpenter controller and GCP provider need access to create instances, subnets, and disks.
Prepare the GCP Credentials
Enable Required APIs
Enable the necessary Google Cloud APIs for Karpenter to manage compute and Kubernetes resources:
gcloud services enable compute.googleapis.com
gcloud services enable container.googleapis.com
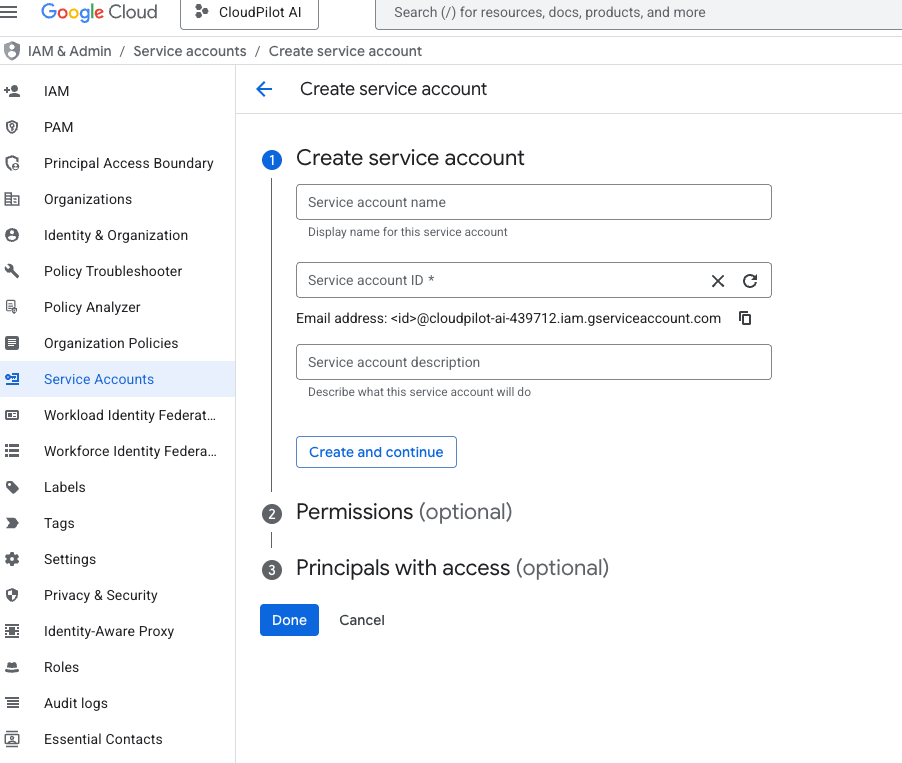
Create Service Account and Download Keys
Create a GCP service account with the following roles:
- Compute Admin
- Kubernetes Engine Admin
- Monitoring Admin
- Service Account User
These permissions allow Karpenter to manage GCE instances, access GKE metadata, and report monitoring metrics.
After creating the service account, generate a JSON key file and store it in a secure location. This key will be used to authenticate Karpenter with GCP APIs.


Create Cluster Secret
Create a Kubernetes Secret to store your GCP service account credentials:
apiVersion: v1
kind: Secret
metadata:
  name: karpenter-gcp-credentials
  namespace: karpenter-system
type: Opaque
stringData:
  key.json: |
    {
      "type": "service_account",
      "project_id": "<your-project-id>",
      "private_key_id": "<your-private-key-id>",
      "private_key": "<your-private-key>",
      "client_email": "<your-client-email>",
      "client_id": "<your-client-id>",
      "auth_uri": "https://accounts.google.com/o/oauth2/auth",
      "token_uri": "https://oauth2.googleapis.com/token",
      "auth_provider_x509_cert_url": "https://www.googleapis.com/oauth2/v1/certs",
      "client_x509_cert_url": "<your-client-x509-cert-url>",
      "universe_domain": "googleapis.com"
    }
Save the above as karpenter-gcp-credentials.yaml, then apply it to your cluster:
kubectl create ns karpenter-system
kubectl apply -f karpenter-gcp-credentials.yaml
Installing the Chart
Set the required environment variables before installing the chart:
export PROJECT_ID=<your-google-project-id>
export CLUSTER_NAME=<gke-cluster-name>
export REGION=<gke-region-name>
# Optional: Set the GCP service account email if you want to use a custom service account for the default node pool templates
export DEFAULT_NODEPOOL_SERVICE_ACCOUNT=<your-custom-service-account-email>
Then clone this repository and install the chart with the following command:
helm upgrade karpenter charts/karpenter --install \
  --namespace karpenter-system --create-namespace \
  --set "controller.settings.projectID=${PROJECT_ID}" \
  --set "controller.settings.region=${REGION}" \
  --set "controller.settings.clusterName=${CLUSTER_NAME}" \
  --wait
Testing Node Creation
1. Create NodeClass and NodePool
Apply the following manifests to define how Karpenter should provision nodes on GCP. Be sure to replace <service_account_email_created_before> with the email of the service account you created in the previous step.
cat > nodeclass.yaml <<EOF
apiVersion: karpenter.k8s.gcp/v1alpha1
kind: GCENodeClass
metadata:
  name: default-example
spec:
  serviceAccount: "<service_account_email_created_before>"
  imageSelectorTerms:
    - alias: ContainerOptimizedOS@latest
  tags:
    env: dev
EOF

kubectl apply -f nodeclass.yaml

cat > nodepool.yaml <<EOF
apiVersion: karpenter.sh/v1
kind: NodePool
metadata:
  name: default-nodepool
spec:
  weight: 10
  template:
    spec:
      nodeClassRef:
        name: default-example
        kind: GCENodeClass
        group: karpenter.k8s.gcp
      requirements:
        - key: "karpenter.sh/capacity-type"
          operator: In
          values: ["on-demand", "spot"]
        - key: "karpenter.k8s.gcp/instance-family"
          operator: In
          values: ["n4-standard", "n2-standard", "e2"]
        - key: "kubernetes.io/arch"
          operator: In
          values: ["amd64"]
        - key: "topology.kubernetes.io/zone"
          operator: In
          values: ["us-central1-c", "us-central1-a", "us-central1-f", "us-central1-b"]
EOF

kubectl apply -f nodepool.yaml
2. Create a Workload
Deploy a simple workload to trigger Karpenter to provision a new node:
cat > deployment.yaml <<EOF
apiVersion: apps/v1
kind: Deployment
metadata:
  name: inflate
spec:
  replicas: 1
  selector:
    matchLabels:
      app: inflate
  template:
    metadata:
      labels:
        app: inflate
    spec:
      affinity:
        nodeAffinity:
          requiredDuringSchedulingIgnoredDuringExecution:
            nodeSelectorTerms:
              - matchExpressions:
                  - key: karpenter.sh/capacity-type
                    operator: Exists
      securityContext:
        runAsUser: 1000
        runAsGroup: 3000
        fsGroup: 2000
      containers:
      - image: public.ecr.aws/eks-distro/kubernetes/pause:3.2
        name: inflate
        resources:
          requests:
            cpu: 250m
            memory: 250Mi
        securityContext:
          allowPrivilegeEscalation: false
EOF

kubectl apply -f deployment.yaml
Once the workload is created, check if Karpenter has successfully provisioned a node:
$ kubectl get node
NAME                                       STATUS   ROLES    AGE     VERSION
gke-cluster-1-test-default-1c921401-kzbh   Ready    <none>   17d     v1.32.4-gke.1415000
gke-cluster-1-test-default-84243800-v30f   Ready    <none>   17d     v1.32.4-gke.1415000
gke-cluster-1-test-default-b4608681-5zq5   Ready    <none>   17d     v1.32.4-gke.1415000
karpenter-default-nodepool-sp86k           Ready    <none>   18s     v1.32.4-gke.1415000

$ kubectl get nodeclaim
NAME                     TYPE       CAPACITY   ZONE            NODE                               READY   AGE
default-nodepool-sp86k   e2-small   spot       us-central1-a   karpenter-default-nodepool-sp86k   True    46s
Nodes created by Karpenter will typically have a karpenter.sh/provisioner-name label and may include taints or labels defined in your NodeClass and NodePool.
Join the Community
Have questions, feedback, or want to follow development?
👉 Join our Slack channel
👉 Or hop into Discord to connect with fellow contributors and users
Your feedback will help shape the future of multi-cloud autoscaling with Karpenter!


