Kubernetes 1.27 brought about In-Place Pod Resizing (also known as In-Place Pod Vertical Scaling). But what exactly is it? And what does it mean for you?
In-Place Pod Resizing, introduced as an alpha feature in Kubernetes v1.27, allows you to dynamically adjust the CPU and memory resources of running containers without the traditional requirement of restarting the entire Pod.
While this feature has been available since v1.27, it remained behind a feature gate, meaning it was disabled by default and required manual activation. Feature gates in Kubernetes serve as toggles for experimental or development functionality, enabling cluster administrators to opt into new capabilities while they're still being refined and tested.
At the time of writing, In-Place Pod Resizing has graduated to beta status in Kubernetes v1.33 and will be enabled by default. This progression from alpha to beta signals that the feature has matured considerably and thoroughly, and the API has stabilized enough for broader adoption.
In this article, we'll dive deep into how In-Place Pod Resizing works, walk through a hands-on demo so you can experience Kubernetes' shiniest new feature firsthand, and explore the practical implications for your workloads and infrastructure costs.
A brief history of Kubernetes scaling methods
Before looking ahead, it is worth looking at how workload scaling has traditionally operated on Kubernetes. In the early days, resource allocation was largely a manual affair; you defined your resource requests and limits at deployment time, and those values remained fixed throughout the Pod's lifecycle.
If you needed more resources, you’d update your deployment configuration and wait for Kubernetes to terminate the old Pods and create new ones with the updated resource specifications.
This approach worked well enough for simple, stateless applications, but as Kubernetes adoption grew, so did the complexity of workloads running on it. The need for more dynamic resource management became apparent. This led to the introduction of the Horizontal Pod Autoscaler (HPA) in November 2015 with Kubernetes 1.1. The HPA was designed to help users scale out their workloads more dynamically based on CPU and memory usage.
Fast forward to Kubernetes 1.8, and the Vertical Pod Autoscaler (VPA) was introduced as a way to dynamically resize the CPU and memory allocated to existing pods. While HPA scaled horizontally by adding more instances, VPA scaled vertically by adjusting the resource allocation of individual Pods.
While all this was happening, a joint effort between Microsoft and Red Hat in 2019 led to the creation of Kubernetes Event-driven Autoscaling, or KEDA for short.
Initially geared toward better supporting Azure functions on OpenShift, KEDA's open-source nature meant the community quickly expanded its use case far beyond its original scope.
KEDA enables scaling based on external metrics and events, bridging the gap between traditional resource-based scaling and the complex, event-driven nature of modern applications.
So, if all these scaling methods exist, HPA for horizontal scaling, VPA for vertical scaling, and KEDA for event-driven scaling. Why, then, does In-Place Pod Resizing exist? What problem does it solve that the existing ecosystem doesn't already address?
What is In-Place Pod Resizing?
Simply put, In-Place Pod Vertical Scaling allows you to modify the CPU and memory resources of running containers without restarting the Pod. While this might sound like a minor improvement, it addresses a fundamental limitation that has plagued Kubernetes resource management since its inception.
Traditional vertical scaling in Kubernetes requires what you could call a "rip and replace" approach. When you need to adjust a Pod's resources, whether through manual updates or through one of the Pod autoscalers, Kubernetes would terminate the existing Pod and create a new one with the updated resource specifications. This process, while functional, introduced several disruptive side effects that could be problematic for certain workloads.
The most immediate impact was the disruption of TCP connections. When a Pod restarts, all existing network connections are severed, forcing clients to reconnect and potentially lose in-flight requests for stateful and stateless workloads that need to maintain steady connections with data stores.
In-place resizing eliminates this disruption by allowing the container runtime to adjust resource limits and requests without terminating the container process.
How does In-Place Pod Resizing work?
To understand how In-Place Pod Resizing (In-Place Pod Vertical Scaling) works, we can take a trip back to 2019, with the original enhancement proposal being opened in GitHub issue #1287.
At its core, in-place resizing introduces a clear distinction between what you want and what you currently have. The Pod.Spec.Containers[i].Resources field now represents the desired state of Pod resources—think of it as your target configuration. Meanwhile, the new Pod.Status.ContainerStatuses [i].Resources field shows the actual resources currently allocated to running containers, reflecting what's really happening on the node.
This architectural change enables a more sophisticated resource management workflow. When you want to resize a Pod, you no longer directly modify the Pod specification. Instead, you interact with a new /resize sub-resource that accepts only specific resource-related fields. This dedicated endpoint ensures that resource changes go through proper validation and don't interfere with other Pod operations.
Also introduced is the concept of allocated resources through Pod.Status.ContainerStatuses [i].AllocatedResources. When the Kubelet initially admits a Pod or processes a resize request, it caches these resource requirements locally. This cached state becomes the source of truth for the container runtime when containers are started or restarted, ensuring consistency across the resize lifecycle.
Below is the diagram from the original KEP, which shows a simplified workflow of how this orchestration happens:
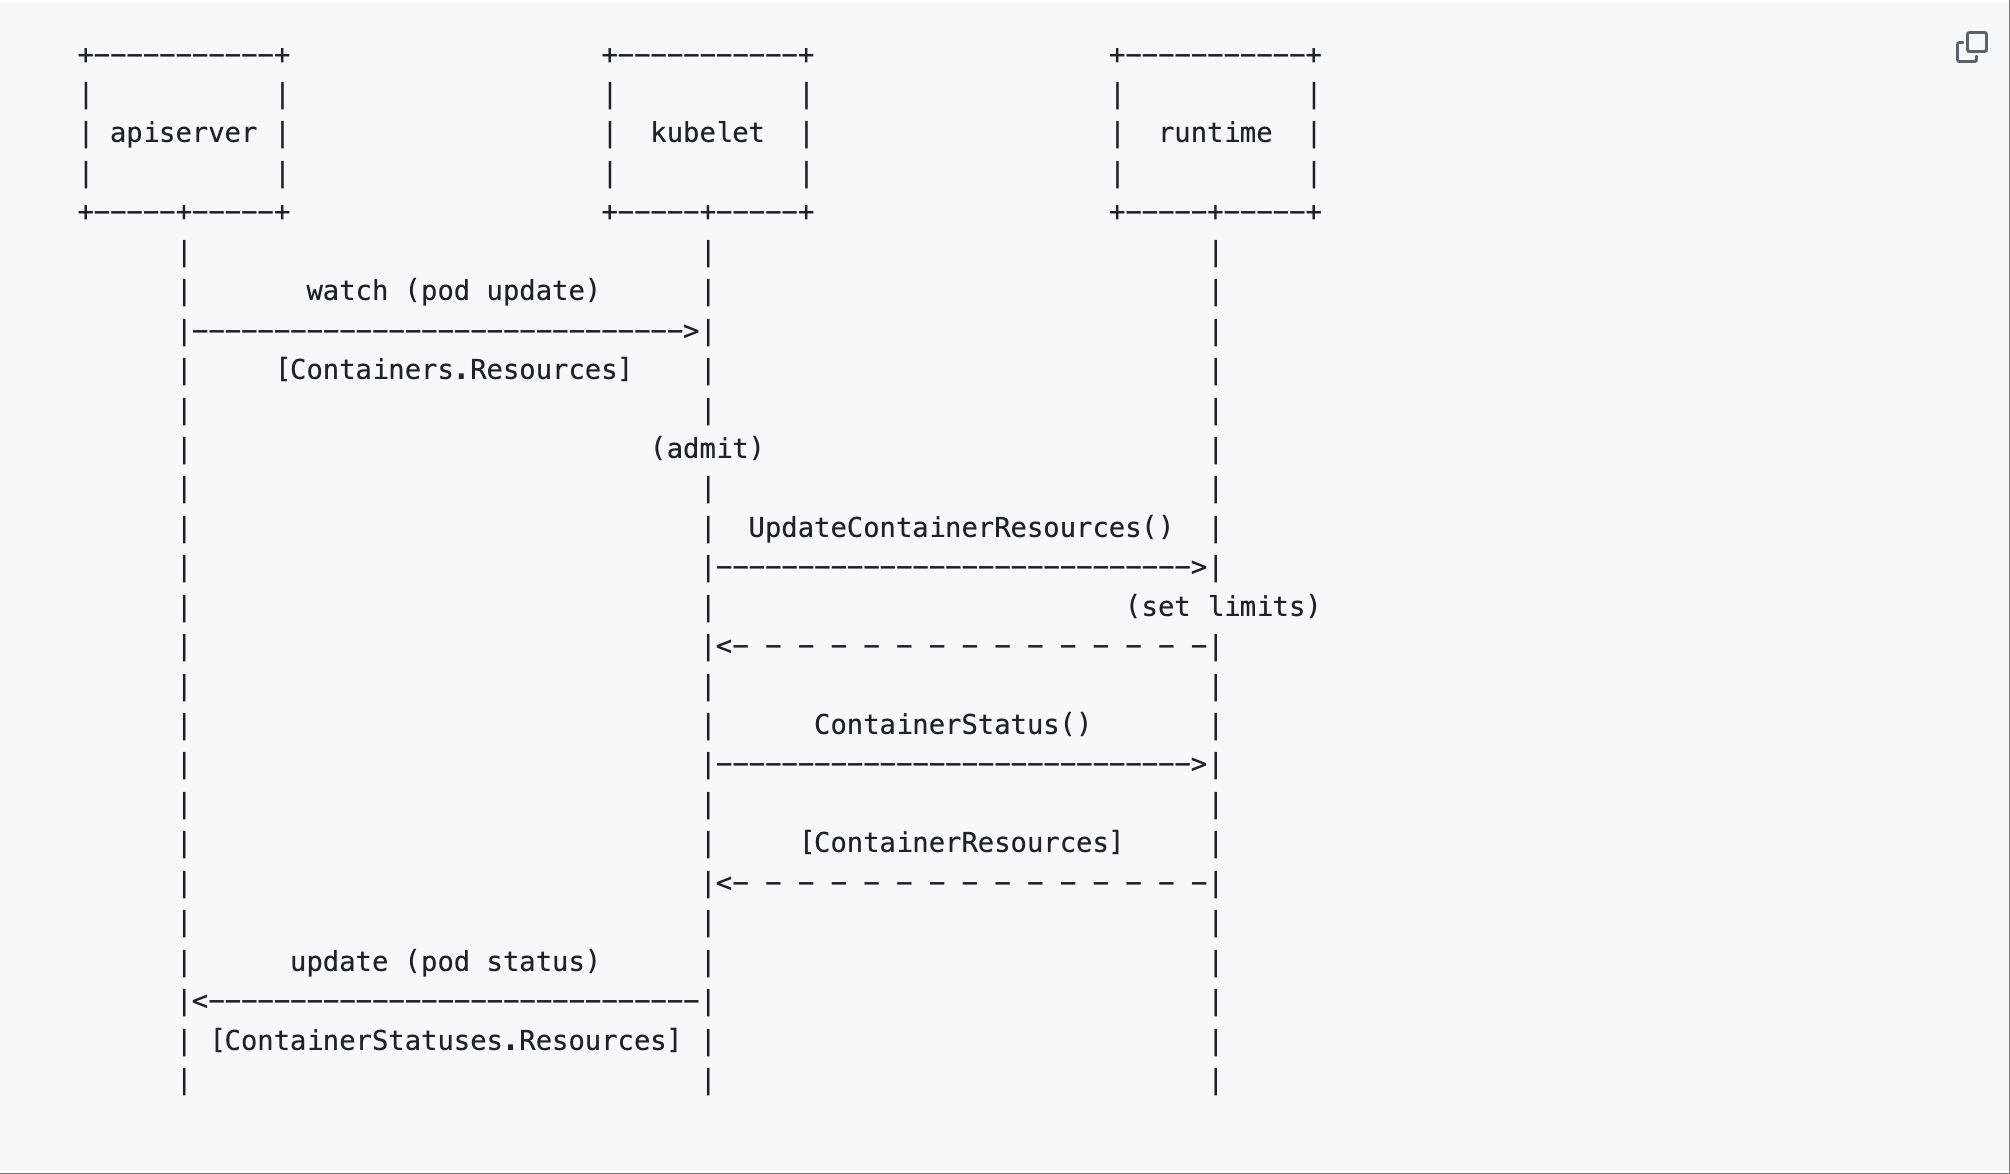
source: Kubernetes Enhancements repo
From the diagram:
- The API server receives resize requests
- The Kubelet watches for Pod updates and calls the container runtime's
UpdateContainerResources()API to set new limits, - The runtime reports back the actual resource state through
ContainerStatus().
To track the progress of resize operations, the system uses two new Pod conditions: PodResizePending indicates when a resize has been requested but not yet processed by the Kubelet, while PodResizeInProgress shows when a resize is actively being applied.
These conditions provide visibility into the resize lifecycle and help operators understand what's happening during resource transitions.
Use cases for In-Place Pod Resizing
With some of the inner workings understood, you are likely wondering how this applies to your workloads going forward. Here are a few use cases.
Machine learning
Machine learning workloads are perhaps the most compelling case for in-place resizing. Consider a typical ML pipeline where a model training job starts with data preprocessing, a CPU-intensive phase that requires minimal memory. As training progresses to the actual model computation phase, the workload becomes memory-intensive while CPU requirements may decrease.
Traditional scaling would require terminating the Pod and losing hours of training progress just to adjust resource allocation. With in-place resizing, the same Pod can transition from a CPU-optimized configuration during preprocessing to a memory-optimized setup during training, and then scale down to a balanced configuration for model serving.
Maintaining database connections through resource changes
Without in-place resizing, requesting additional memory would sever the database connection, forcing the job to re-establish connections, potentially lose transaction context. With in-place resizing, the same Pod can request additional memory mid-processing while maintaining its database connections.
Cost optimization
Where in-place resizing can deliver measurable value is cost savings. Traditional resource management often leads to over-provisioning because teams need to account for peak resource usage across the entire application lifecycle. A Pod that needs 4GB of memory during peak processing but only 1GB during steady state would typically be allocated 4GB throughout its entire lifecycle.
Hands-on with In-Place Pod Resizing
With many of the fundamentals out of the way, here's how you can test in-place Pod resizing locally.
Prerequisites
To follow along with this guide, you need the following tools configured on your machine:
- KinD: This enables you to create a local cluster, and more specifically, you can specify the version of Kubernetes you’d like to run
- Kubectl: This is used for interacting with the cluster
Step 1: Create a cluster configuration
In order to specify the version and feature gates of Kubernetes you would like to enable, KinD allows you to define this using a configuration file.
Within your terminal, run the following command:
cat <<EOF > cluster.yaml
kind: Cluster
apiVersion: kind.x-k8s.io/v1alpha4
name: inplace
featureGates:
  "InPlacePodVerticalScaling": true
nodes:
- role: control-plane
  image: kindest/node:v1.33.1@sha256:050072256b9a903bd914c0b2866828150cb229cea0efe5892e2b644d5dd3b34f
- role: worker
  image: kindest/node:v1.33.1@sha256:050072256b9a903bd914c0b2866828150cb229cea0efe5892e2b644d5dd3b34f
EOF
The important bit to note here is featureGates, which is where you specify what feature gate to enable. In this case, InPlacePodVerticalScaling and the node images v1.33.1 are specified. This was obtained from the kind release page on GitHub.
Provision the cluster by running the following command:
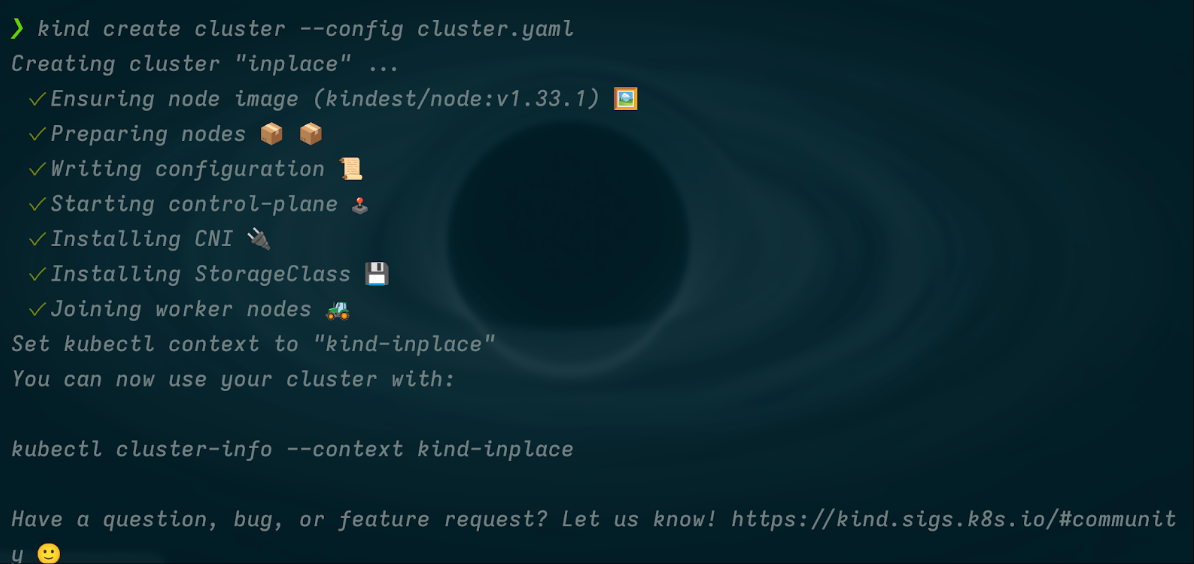
kind create cluster --config cluster.yaml
Your output should be similar to:
Step 2: Create a test deployment
First, deploy a simple application that we can resize. To do this, apply the following manifest:
cat <<EOF | kubectl apply -f -
apiVersion: apps/v1
kind: Deployment
metadata:
  name: app
spec:
  replicas: 1
  selector:
    matchLabels:
      app: app
  template:
    metadata:
      labels:
        app: app
    spec:
      containers:
      - name: nginx
        image: nginx
        resources:
          limits:
            memory: "1Gi"
            cpu: 3
          requests:
            memory: "500Mi"
            cpu: 2
        resizePolicy:
        - resourceName: cpu
          restartPolicy: NotRequired
        - resourceName: memory
          restartPolicy: RestartContainer
EOF
Take note of the resizePolicy configuration, this is where you specify how your application should handle resource changes. For CPU, you've set restartPolicy: NotRequired, meaning the container can have its CPU allocation adjusted without restarting. For memory, you've specified restartPolicy: RestartContainer, indicating that memory changes will trigger a container restart.
This configuration is particularly useful for memory-bound applications that need to restart anyway to take advantage of additional memory allocation. Applications like Java, processes with heap size configurations or databases with buffer pool settings often require a restart to properly utilize new memory limits, making the explicit restart policy a sensible choice.
Step 3: Verifying initial CPU allocation
Before making any changes, check the current CPU allocation by examining the container's cgroup settings:
kubectl exec -it $(kubectl get pods -l app=app -o jsonpath='{.items[0].metadata.name}') -- cat /sys/fs/cgroup/cpu.max
The command above checks /sys/fs/cgroup/cpu.max within the container because this is where the Linux kernel exposes the CPU quota and period settings that control how much CPU time a container can use.
The output shows two values:
- The CPU quota (how much CPU time the container can use)
- The period (the time window for that quota)
Together, these determine the effective CPU limit.
The output is similar to:

Step 4: Performing an in-place CPU resize
Now, increase the CPU limit from 3 to 4 cores using a patch operation:
kubectl patch deployment app --patch '{
  "spec": {
    "template": {
      "spec": {
        "containers": [{
          "name": "nginx",
          "resources": {
            "limits": {
              "cpu": "4"
            }
          }
        }]
      }
    }
  }
}'
After applying the patch, check the CPU allocation again:
kubectl exec -it $(kubectl get pods -l app=app -o jsonpath='{.items[0].metadata.name}') -- cat /sys/fs/cgroup/cpu.max
The changes take a few seconds to reflect in the cgroup settings, but you should see output similar to:

Finally, you can verify there were indeed no restarts by running:
k get pods -o wide
The output is similar to:

Important nuances of in-place scaling (caveats)
Like all great things in software, there are some caveats to in-place Pod resizing.
Container runtime support
In-place resizing requires specific container runtime support, and not all runtimes are compatible. Currently, containerd v1.6.9+, CRI-O v1.24.2+, and Podman v4.0.0+ support the necessary APIs for in-place resource updates. If you're running an older runtime version, you'll need to upgrade before you can take advantage of this feature.
Default resize behavior
All new Pods are automatically created with a resizePolicy field set for each container. If you don't explicitly configure this field, the default behavior is restartPolicy: NotRequired, meaning containers will attempt in-place resizing without restarts. While this default works well for most applications, you should explicitly set resize policies for containers that require restarts to properly utilize new resource allocations.
Resource allocation boundaries
Requesting more resources than available on the node doesn't trigger Pod eviction, regardless of whether you're adjusting CPU or memory limits. This behavior differs from traditional resource management where resource pressure might cause Pod scheduling changes. Your resize request will simply remain pending until sufficient resources become available on the node.
Bringing Intelligence to Kubernetes Resource Management
The Octarine (v1.33) release of Kubernetes is a welcome development, reflecting the community's commitment to delivering innovative features. This blog covered in-place Pod resizing, what it is, why it exists and how you can use it in your Kubernetes environments.
As mentioned earlier, the Kubernetes autoscaling ecosystem consists of many tools to address different layers of an environment: Pods, resources, infrastructure, and external load.
If your current scaling setup relies solely on HPA and Cluster Autoscaler, you're likely leaving efficiency, resilience, and cost savings on the table. CloudPilot AI complements these tools by automating Spot instance management and intelligently selecting optimal nodes across 800+ instance types, helping teams scale smarter and spend less.