If you’ve ever opened your cloud bill and wondered why your Kubernetes cluster costs keep climbing despite "auto-scaling", you’re not alone. Many teams face the same problem: over-provisioned clusters that waste resources or under-provisioned clusters that cause latency, pod evictions, or service degradation.
Kubernetes was built to orchestrate containers efficiently, but it doesn’t automatically ensure your workloads are right-sized. Without structured capacity planning, organizations either overspend for peace of mind or risk performance issues to save money. Striking the right balance between cost and reliability is where Kubernetes capacity planning comes in.
What Is Kubernetes Capacity Planning?
Kubernetes capacity planning is the discipline of understanding, forecasting, and optimizing how your cluster consumes infrastructure resources such as CPU, memory, storage, and network bandwidth. It ensures that your workloads always have enough resources to run reliably while minimizing waste and controlling cloud costs.
At its core, capacity planning bridges two competing goals: performance and efficiency. On the one hand, you need to ensure there are enough resources available to handle peak workloads without failures or latency.
On the other, over-allocating resources can result in idle capacity and unnecessary cloud spend. The goal is to find the “sweet spot” where your Kubernetes environment runs smoothly, scales predictably, and remains financially sustainable.
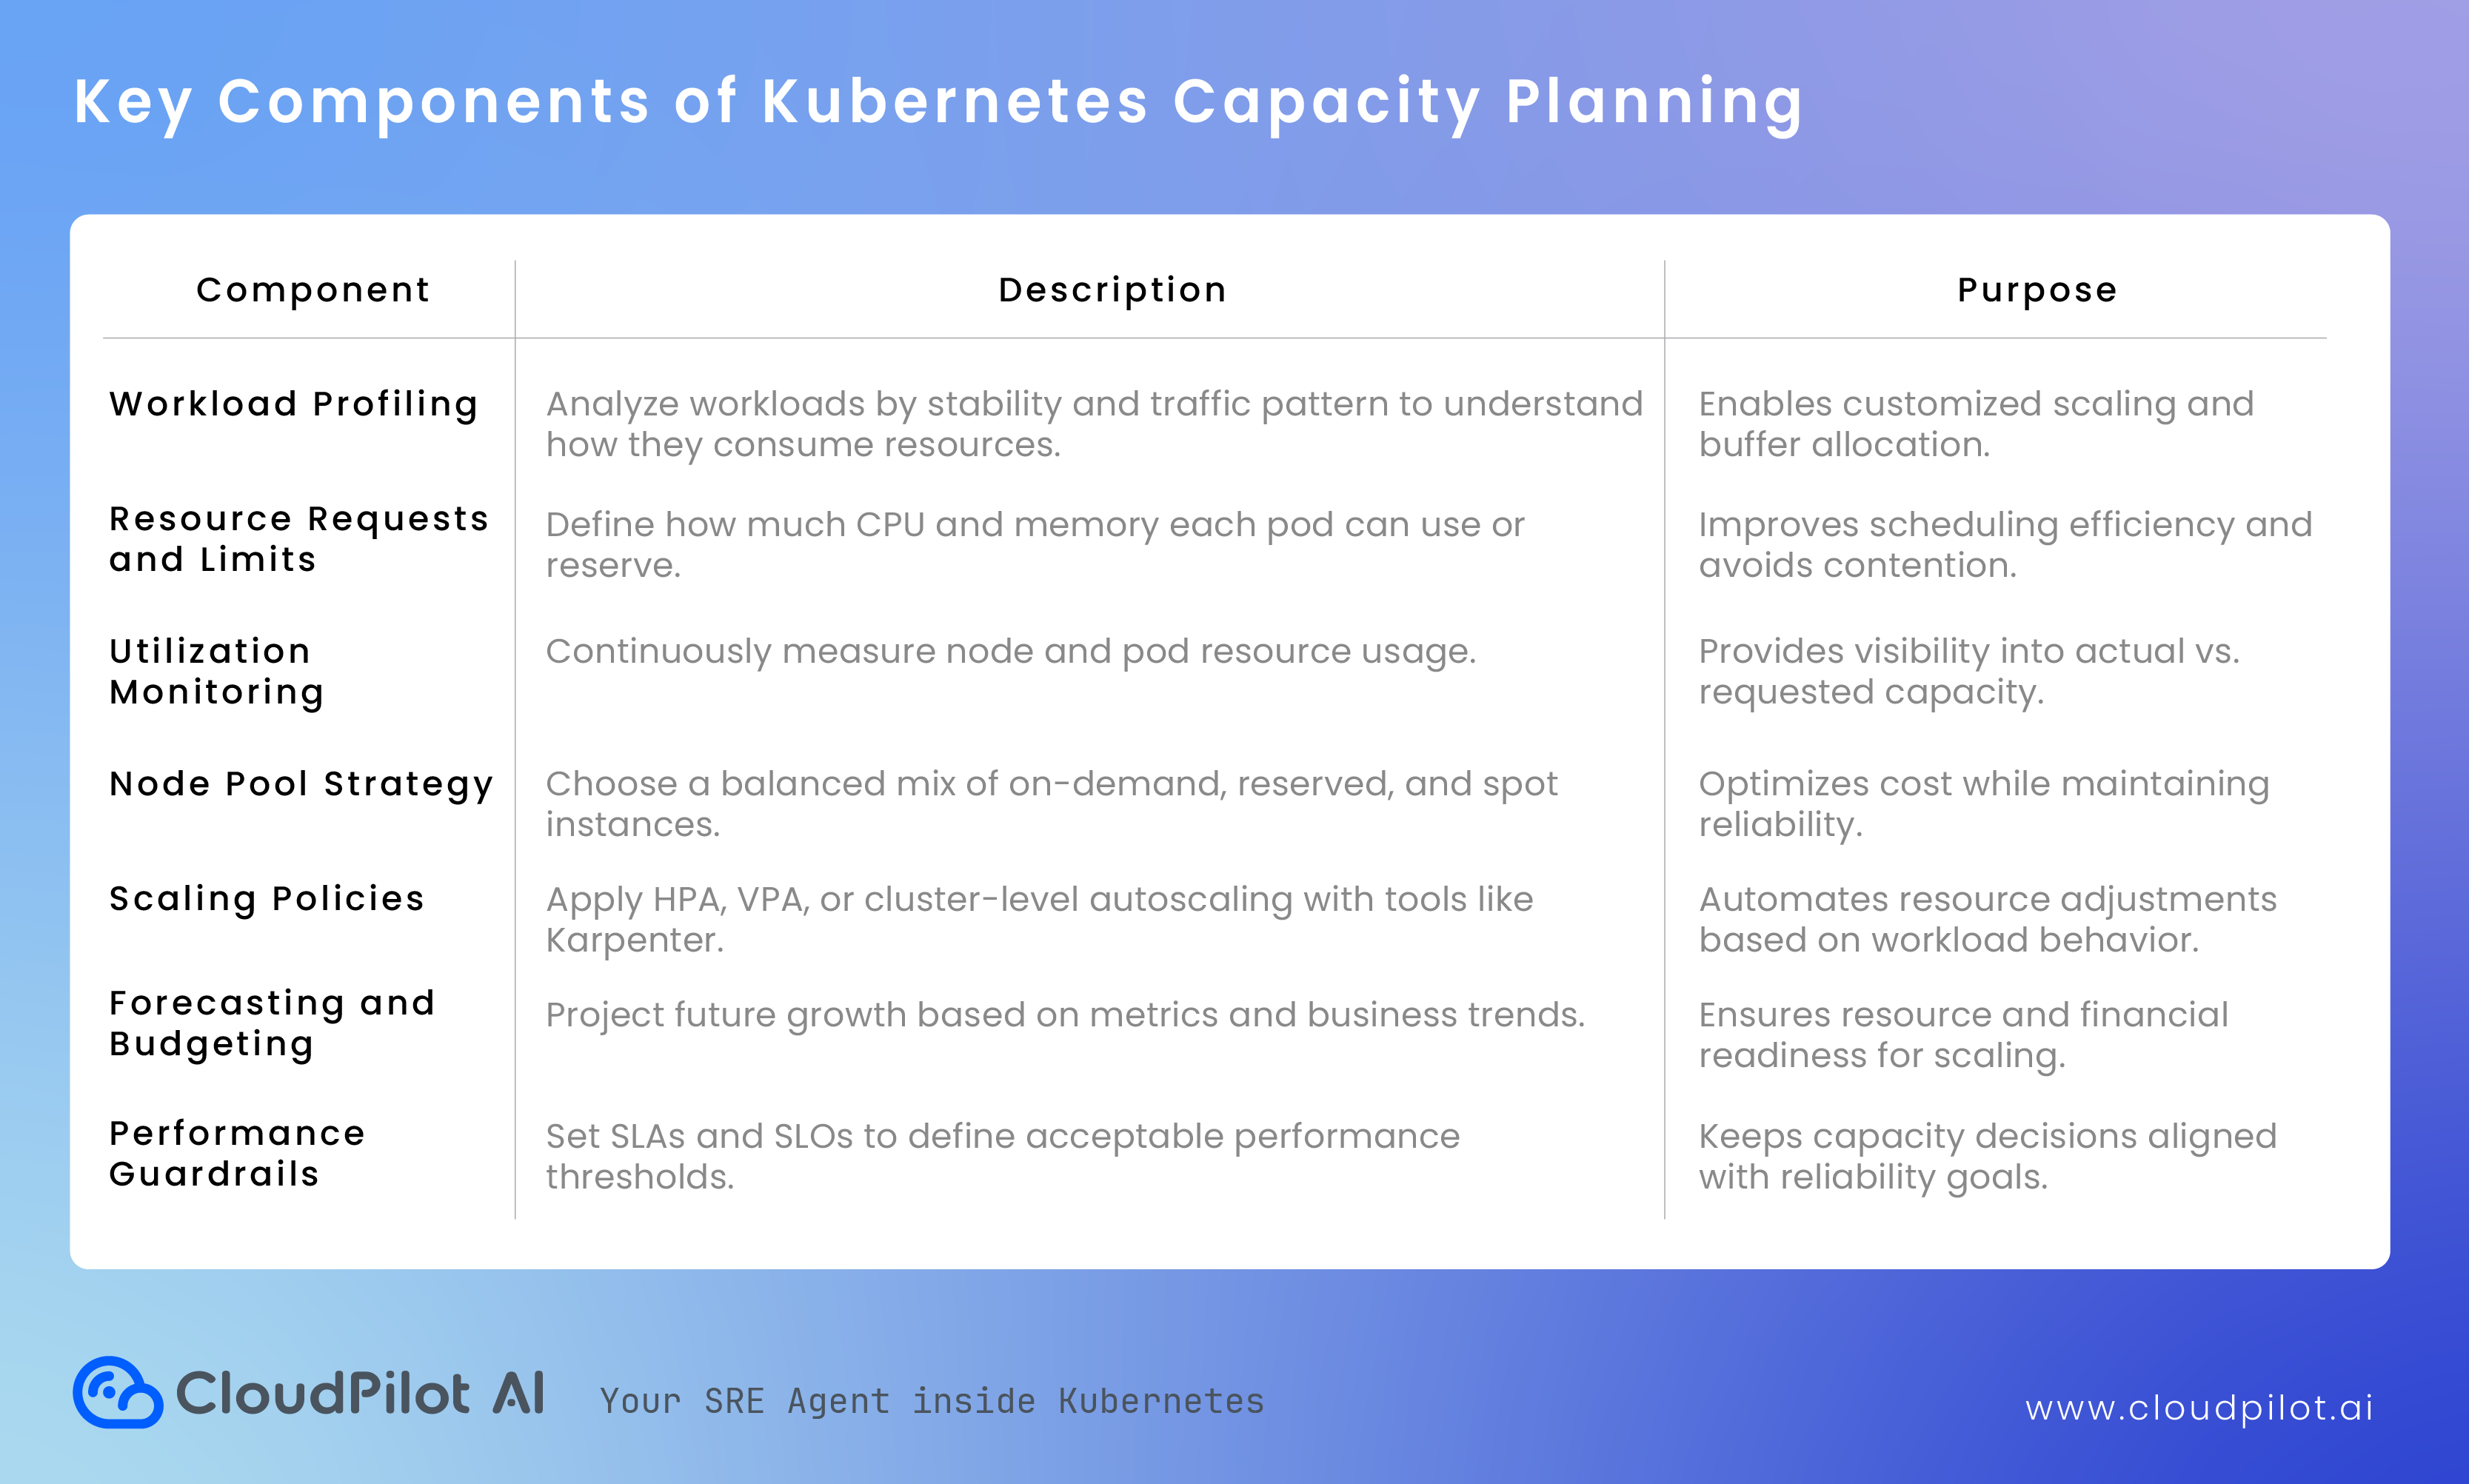
A typical capacity planning process in Kubernetes involves three layers of consideration:
1. Workload-Level Planning
Every application running in a Kubernetes cluster requests a certain amount of CPU and memory. These requests and limits influence how the Kubernetes scheduler places pods across nodes. If requests are too high, the scheduler may leave nodes underutilized. If they’re too low, workloads risk contention and instability.
Effective capacity planning starts by analyzing workload characteristics, such as CPU spikes, memory consumption trends, and traffic variability, to define accurate requests and limits. This ensures pods receive the resources they need without starving others or wasting compute.
2. Cluster-Level Planning
Once workloads are right-sized, attention shifts to the cluster’s node composition. You must decide how many nodes are needed, what instance types to use, and how to distribute them across availability zones. Cluster-level planning also involves determining whether to use on-demand, reserved, or spot instances, balancing cost with resilience.
For example, steady workloads might run on reserved instances for predictable cost, while fault-tolerant batch jobs can leverage cheaper spot capacity.
3. Strategic Forecasting and Scalability Planning
Beyond day-to-day resource allocation, capacity planning also looks ahead. As traffic grows, new services launch, or regions expand, teams must predict future demand. Forecasting involves analyzing historical usage patterns and growth rates to project when additional capacity will be needed.
This prevents last-minute scaling issues, such as running out of schedulable nodes during peak events, and allows teams to plan budgets and scaling policies proactively.
Capacity planning in Kubernetes is both a technical and strategic process. It requires collaboration between engineering and finance teams, blending performance data with business insights.
Technically, it leverages monitoring tools, autoscalers, and cloud analytics to quantify usage patterns. Strategically, it guides long-term infrastructure investment and helps organizations adopt modern pricing models, such as spot or savings plans, without compromising reliability.
Why Capacity Planning Matters
1. Cost Optimization
Most Kubernetes environments operate at less than 50% average resource utilization. This means you could be paying twice as much for infrastructure as you actually need. Proper capacity planning identifies inefficiencies, enabling teams to safely reduce over-provisioning and control costs.
2. Reliable Performance
Right-sized clusters prevent resource contention and ensure that critical workloads always have the compute and memory they need. This translates to consistent performance, fewer OOM errors, and reduced service disruptions.
3. Predictable Scalability
By forecasting future resource needs, teams can scale smoothly as application demand grows. Capacity planning removes guesswork from cluster expansion and helps avoid emergency node provisioning during peak hours.
4. Business Continuity
A well-planned cluster prevents outages caused by capacity shortages. It supports high availability strategies, ensuring that even during spikes or failures, user-facing services continue running seamlessly.
How Capacity Planning Works
Kubernetes capacity planning combines data analysis, forecasting, and automation. It starts by measuring how your workloads consume resources and ends with decisions about how your cluster should scale and what instance types it should use.
1. Collect Usage Data
Begin by gathering real usage data from your monitoring tools such as Prometheus, CloudWatch, or Datadog. Focus on CPU and memory requests, actual utilization, and the frequency of pod rescheduling or throttling. This establishes a baseline for current performance and efficiency.
2. Analyze Workload Behavior
Different workloads have different demand patterns. Some are steady and predictable, while others spike based on traffic or job schedules. By classifying workloads according to these patterns, you can design scaling strategies that meet each workload’s needs without wasting resources.
3. Model Future Growth
Forecasting helps you anticipate when demand will exceed current capacity. By analyzing historical metrics and business growth projections, teams can plan node expansions or instance upgrades ahead of time rather than reacting to incidents.
4. Implement Scaling Policies
Once demand patterns are clear, you can apply scaling tools such as the Horizontal Pod Autoscaler (HPA), Vertical Pod Autoscaler (VPA), or Karpenter to dynamically adjust capacity. These policies ensure that clusters expand during traffic peaks and shrink when workloads are idle.
5. Refine Continuously
Capacity planning is never finished. Continuous monitoring and adjustment are essential, as workloads evolve and usage patterns shift over time.
Capacity Planning Playbook
Phase 1: Establish Visibility
1. Enable Resource Metrics
- Install and configure:
metrics-server- Prometheus and Grafana
- Ensure the following metrics are available:
- Pod CPU and memory usage (
container_cpu_usage_seconds_total,container_memory_working_set_bytes) - Node utilization
- Pending pods count
- Throttling and OOMKill events
- Pod CPU and memory usage (
2. Collect Baseline Data
- Run for at least 7–14 days to capture weekday and weekend patterns.
- Export data as:
kubectl top pods --all-namespaces > resource-usage.txt,kubectl top nodes > node-usage.txt
3. Visualize Utilization
- Create Grafana dashboards showing:
- Cluster CPU/memory usage vs. capacity
- Requests vs. actual usage
- Node utilization heatmaps
- Namespace-level resource consumption
Key Metrics to Track
| Metric | Ideal Range | Why It Matters |
|---|---|---|
| CPU utilization | 60–80% | Below this → waste; above → risk of throttling |
| Memory utilization | 60–75% | Memory spikes cause OOM errors |
| Pending pods | 0–2% of total | Indicates scheduling or quota issues |
| Cost per namespace | Decreasing trend | Tracks efficiency over time |
Phase 2: Analyze and Identify Inefficiencies
1. Compare Requested vs. Actual Usage
kubectl get pods -A -o=custom-columns=NAME:.metadata.name,REQ_CPU:.spec.containers[*].resources.requests.cpu,REQ_MEM:.spec.containers[*].resources.requests.memory
Cross-check against Prometheus usage data.
2. Detect Over-Provisioned Pods
If actual usage < 50% of requested CPU/memory → candidate for rightsizing.
3. Detect Under-Provisioned Pods
If actual usage > 90% of requested → risk of throttling or OOMKill.
4. Use Automated Tools
- Goldilocks: recommends requests/limits based on historical metrics.
- CloudPilot AI Workload Autoscaler: continuously adjusts resource requests based on real-time utilization and trends.
Phase 3: Optimize Resource Requests and Limits
1. Set New Requests/Limits
- Start with the 80th percentile of observed usage as request value.
- Only set limits if necessary (e.g., memory-heavy or bursty workloads).
2. Gradually Apply Changes
-
Update one namespace or deployment group at a time.
-
Use a rolling deployment to minimize disruption:
kubectl rollout restart deployment <name>
3. Monitor After Changes
- Watch Grafana dashboards for:
- New OOMKills or throttling
- Utilization improvements
- Scheduling delays
💡 Tip:
Avoid making requests = limits. Allow some burst capacity to improve bin packing and scheduling efficiency.
Phase 4: Plan Node and Cluster Capacity
1. Determine Baseline Node Count
-
Calculate average node utilization.
-
Use formula:
Required Nodes = (Total Pod CPU Requests / Node CPU Capacity) × Safety Buffer -
Example: 500 vCPU requested / 32 vCPU per node × 1.2 buffer = ~19 nodes.
2. Right-Size Node Types
- Compare actual workload profiles:
| Workload Type | Recommended Node Type |
|---|---|
| Compute-heavy | c6i / c7g |
| Memory-heavy | r6i / r7g |
| Bursty / batch | spot instances |
| ML / GPU jobs | g5 / a10g |
3. Use Karpenter or Cluster Autoscaler
- Configure Karpenter to dynamically launch optimized nodes:
requirements:
  - key: "node.kubernetes.io/instance-type"
    operator: In
    values: ["m6i.large", "m6i.xlarge"]
limits:
  resources:
    cpu: 1000
- Set different node pools for on-demand and spot capacity.
4. Add Safety Buffers
- Reserve at least 15–25% extra capacity for critical workloads or sudden spikes.
Phase 5: Forecast and Budget
1. Analyze Historical Growth
- Use Prometheus or cloud cost tools to chart 3–6 month growth trends.
- Track CPU hours, memory GB hours, and node count over time.
2. Estimate Future Demand
- Apply trend-based forecasting:
Future Capacity = Current Usage × (1 + Growth Rate) × Safety Margin
- Example: 400 cores × (1 + 0.25) × 1.2 = 600 cores.
3. Simulate Scenarios
- “What if traffic doubles?”
- “What if we migrate 30% of jobs to spot?”
- Adjust budgets and scaling strategies accordingly.
Phase 6: Continuous Review and Automation
1. Monthly Review
- Compare forecasted vs. actual usage.
- Identify new over-provisioned namespaces.
- Review cost by workload or environment.
2. Quarterly Optimization
- Update node instance types for new pricing options.
- Review reserved instance and savings plan utilization.
3. Automate Scaling
- Integrate with:
- Horizontal Pod Autoscaler (for application-level scaling)
- Vertical Pod Autoscaler (for automatic right-sizing)
- Karpenter (for predictive node provisioning)
4. Alerting
- Configure alerts for:
- 90% node CPU/memory
- High pod pending rates
- Excessive cost anomalies
Kubernetes Capacity Planning Checklist
- Metrics collection is complete and accurate
- Resource requests match observed 80th percentile usage
- Growth forecast reviewed and budget approved
- Autoscaling policies tuned and tested
- Alerting for capacity saturation in place
- Regular review cadence established
How CloudPilot AI Helps with Capacity Planning
Manual capacity planning in Kubernetes is complex and time-consuming. Resource patterns change by the hour, workloads evolve, and spot prices fluctuate constantly. CloudPilot AI eliminates guesswork by introducing autonomous optimization at both the workload and node levels.
Here’s how CloudPilot AI transforms capacity planning into a continuous, intelligent process:
- Workload-Level Optimization: Automatically right-sizes workloads based on real-time CPU and memory usage, preventing over-allocation and improving cluster density.
- Node-Level Optimization: Dynamically selects the best instance types (including spot, on-demand) using price, performance, and availability data.
- Intelligent Scheduling: Ensures workloads are placed efficiently across nodes for maximum utilization and stability.
- Autonomous Scaling: Integrates seamlessly with Karpenter and autoscaling tools to maintain optimal capacity while reducing costs by up to 80%.
With CloudPilot AI, capacity planning becomes proactive and automated. Instead of reacting to resource issues, your clusters stay optimized — continuously, intelligently, and cost-effectively.


